• Skip to main content
  • Skip to primary sidebar
  • Skip to footer

  • Home
  • About
  • Gallery
  • Classes
  • Trips
  • Books
  • Blog
  • Contact
  • Sign Up For My Blog

Blog

Sun Embellishing – Part 2

July 18, 2021 5 Comments

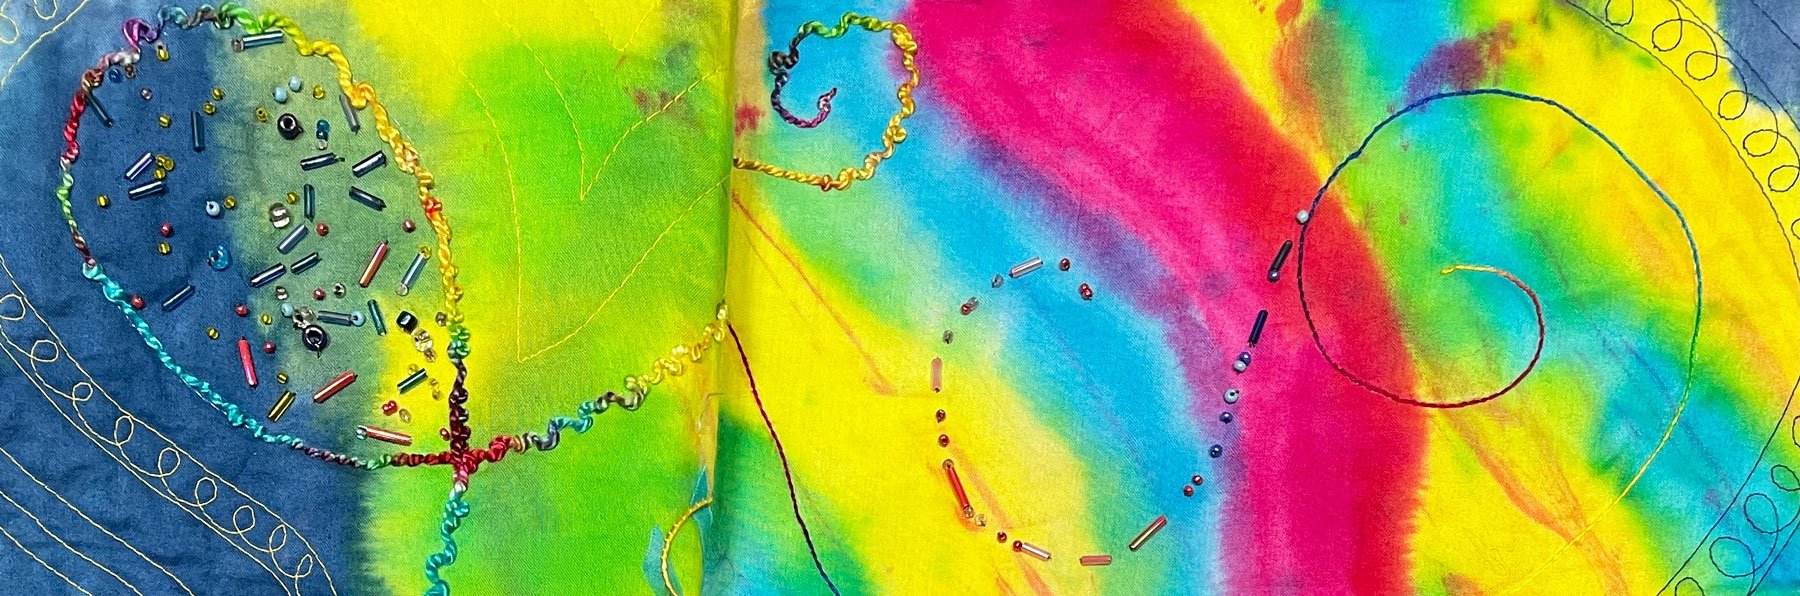
In a previous project I paired larger triangle shaped beads, that had big holes, with a metallic yarn threaded through them for a “seaweed” effect.

When it came to beading the rays I found these delightful square orange beads. Since the square beads had big enough holes to do the same thing, I quickly searched my yarn/cord bin to find a piece of gold braided ribbon. It was thin enough to pull through the quilt top at the ends to finish each ray, and stitching it down with the beads was great fun (note: the fine pins are holding the beads in place as I stitch).

Once the sun itself was embellished, I felt it was time to add more rays in the sky. If I beaded them through the wool batting, I would lose the trapunto effect I wanted behind the sun. So, before I beaded the extra rays in the background, I trimmed the batting away behind the sky.

At this point I realized it would be difficult to machine quilt around the lines of beads once they were stitched in the sky, so I layered the top with backing and a thin batt, and straight pin basted it together.

Next I took a photo of the beaded sun with my iPad. I’m able to “write” on the screen with my “iPencil”, so I used it to audition quilting designs. There are phone apps that allow you to do this using your finger as the pencil; or the image can be printed, put in a plastic page protector, and drawn on with a washable marker. Here is the design I liked the best. I’ve also done this with Glad Press and Seal™ (click here for a post on that technique).

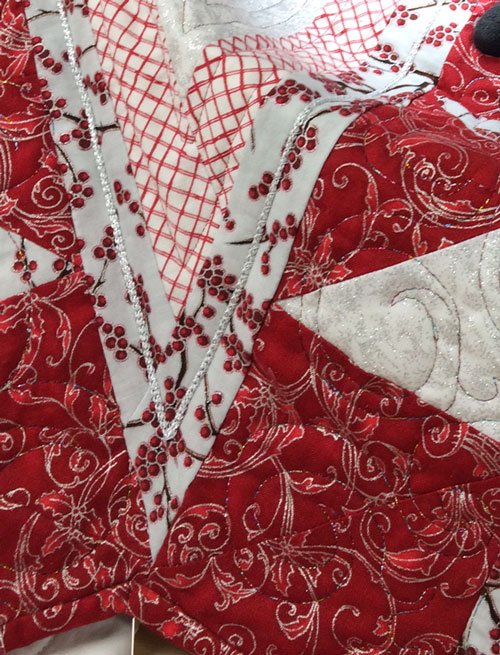
I drew similar lines onto the quilt top with a sliver of soap and quilted around them, leaving a path for the beads. Then, to make the trapunto batting under the sun “poof”, I meandered in the background.

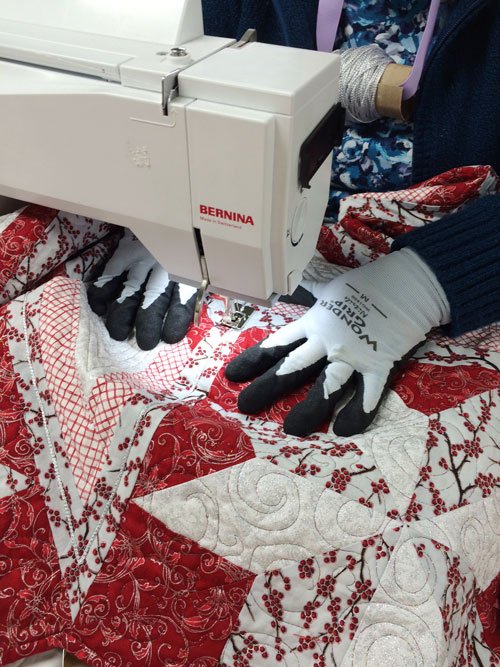
Even though the sun itself had been quilted already, it needed to be quilted through these new layers. The quilting didn’t need to be as heavy, but even doing just a bit presented the problem of the beads being in the way. To make it work I quilted over some of the existing arcs and lines with a zipper foot. Where there’s a will, there’s a way 😁.

The beads in the sky were added, the quilt was faced, and voila… my sun quilt is done!

I’m working on making this into a 3 hour class. If your guild is interested – let me know 😁.

Sun Embellishing – Part 1

July 11, 2021 7 Comments

Before I began “beading the sun” I decided to back my piece with wool batting (if you missed last week’s intro to this topic click here). In this way I’m able to hide my knots in the batting and have a more substantial surface to hold the beads.

My plan was to trim away the batting from behind the sky after the beading is done, and layer it all with a flatter cotton batt. This will create a trapunto look behind the sun.

Next I gathered my beads and supplies and began laying out some favorites from my collection:

I added an arc of fasteners to the layout:

then I auditioned some snaps and interspersed beads to see how it all would look:

Next I marked the areas to be quilted.

The quilting needed to be done before the beading. I used a bright variegated thread to quilt the “channels” and “fillers”.

Once quilted – the beading could begin! I found some very intriguing beads in my collection (I’m as addicted to collecting beads as I am to collecting fabric!) This circle bead has the holes going through from the side and room for an additional bead in the center.

I’m really enjoying stitching down the fun patterns:

There are more beads to come, but I’ll save that for next week’s post.

And speaking of beading… I found this post on FaceBook (the text is part of the post):

Isn’t this just screaming to be beaded??? I actually wrote Harvard University and obtained permission to make a piece of beaded fiber art based on this amazing photo. We’ll see if I actually do it 😊. I can’t imagine how anyone could think that something this tiny and complex could happen by chance. God’s imagination is infinite!

Beading the Sun

July 4, 2021 4 Comments

Happy Independence Day! With all the recent days of sunshine and heat, I thought it was a great time to tell you about my most recent project. It came to be with inspiration from three different directions.

I received a comment from Karen to a recent post about my mailing tape beading technique (click here to link to that post):

“Let us know when you will be teaching another class in adding beads to a quilt.  I have tons of beads and need some ideas on how to use them on a quilt.”

This got me to thinking that I haven’t done any beading classes for a long time. Then the ThreadBenders group chose a small challenge theme of “Sun”. This challenge had very few rules – “make a quilt with a sun on it” 🌞 . On top of that I was excited about the wonderful way Clara embellished a wall hanging with fasteners (click here to read it). This all came together in my brain and I jumped right in to my beaded sun quilt.

So where did I begin? Well – I needed to have a base for my beading and it needed to contain the sun. I chose a wonderful, bright hand-dyed fabric for the sun and a beautiful blue hand-dyed fabric for the sky. These were fat quarters from my stash and the colors alone made me want to continue. I drew an appropriately sized 1/4 sun (it seemed to fit best) on a piece of freezer paper, cut it out, ironed the shiny side to the sun fabric, and layered it with the sky. Then I stitched along the outside of the paper, through both layers.

all the way around.

The paper was peeled away and the excess sun fabric was trimmed next to the stitching, ala my raw-edged Repliqué technique.

Leaving me a wonderful top to embellish.

I trimmed the sky fabric away from behind the sun to reduce bulk (and who would want to waste any of that beautiful fabric?)

During this entire process I was contemplating where and how to embellish. Stay tuned to next week’s post to see where I went from there!

Fascinating Fasteners

May 15, 2021 Leave a Comment

A few weeks ago I received an email from my friend Alice with photos of a lovely wall hanging. Our mutual friend Mary sent the photos to her and I was so pleased to have Alice include me in the sharing. If you look closely you’ll see that all of the designs were made from sewing fasteners!

Who knew you could make something so beautiful from snaps, hooks and eyes??? I contacted Mary and got this wonderful story to go with the photographs:

“Greetings, Chris!
What a delightful surprise to hear from you – and to hear that our photos had made their way to you.  As a result of your inquiry, I had a delightful phone conversation this morning with the resident (Clara Bleak) who made the hanging.  We met her briefly the first day we were here, but, because of COVID, I have not talked with her since.  
Clara lives at Founders Ridge in Bloomington, MN.  At one time she made all her own clothing, but other than mending and hemming she no longer sews. (Frank thinks she is in her 90s.)   Clara designed and made the black and white wallhanging while she and her husband lived in France where he was working.  She said, “I needed something to do.”  (Isn’t it wonderful how creativity can be nurtured in times of isolation?)  Clara has given the other wallhangings she designed and sewed at that time to her niece – said she has meant to ask her niece for photos of them.  The other wall hangings incorporate embroidery and brass hairpins and other little items she found in France. She said this wall hanging “got lost in the back of a closet”, so she decided to hang it on her door.  I noted that she has not signed or dated it.
You are welcome!
Gratefully, Mary”

Clara certainly has an eye for artistic placement of these utilitarian elements. What an imagination!

I was planning to put together a project for a future beading class and I’m thinking I may need to include some fasteners. Thank you Mary… and Clara!

Well Behaved Beads Revisited

March 14, 2021 5 Comments

Before I get to my “topic of the week”, I’m sure there are a few of you who’d like to know what name we chose for our puppy 😁. Thanks for all of your great suggestions last week. Mike and I really liked the name Noah, but he’s already hearing the command “no” a lot lately and we were concerned it might be confusing to have a name so similar to a word he won’t want to hear. We went back and forth for 2 days trying to find a name we agreed on. Since Mike is a big doggie person, and the two of them will be best buds, I gave in and agreed to the name he liked best since before we met the little guy. So, meet Koda (it means friend or bear):

He’s sweet, funny, and oh so busy; but I still think we should have named him Puddles! He turned 8 weeks old today and, in the 3 days since we took this photo, his floppy ear is sticking up just like the other one. He’s growing fast.

And now … on with the post!

I’ve been creating fiber art for many years and I often add beads to my projects.

I know many of you have taken my classes on this topic, so what I share today may sound familiar – but an email from my friend Nancy caused me to think it was worth repeating:

“Hi Chris,  I have been looking through a lot of my magazines and there is one that I really liked a lot.  It is the American Quilter Magazine. To be specific the April 23, 2007 issue.  The article is titled “Well Behaved Beads”.  I did one medium sized beaded wall hanging.  And I really liked adding the beads.  I thought to myself I would like to do that again.  I started reading the article and had another thought, Who wrote this really neat piece about beading? I checked back to page 82 and there and behold the author is CHRIS LYNN KIRSCH!  WOW!!! I like your idea.  I really need something to keep my beads in place, with no train, boat, car, or no great-grandchildren around.   So thank you for writing the article.   Now I have a bigger motive to start a beaded quilt. Take care!  Nancy” 

Trying to pick up tiny beads that are sitting on a table, with a tiny needle, which is tethered by a thread to your work, can be aggravating. Years ago I came up with a way to make those beads behave and have them a lot closer to my work surface. These techniques are included in my book “Where Do I Start With Fiber Art” along with other beading tricks and information (click here to purchase a copy of that book).

The magic tool is clear mailing tape! And it’s really quite simple:

When the Lord dropped this idea into my brain, I was working on a project that was using a mixture of beads. I decided to sprinkle the beads on my quilt, near the area I wanted to bead, and placed a 2″ length of mailing tape over the loose beads. This held them to the quilt so they couldn’t run away. Once my needle was threaded and I was ready to begin, I rolled the tape back onto itself so a few beads came to the top.

I was then able to touch the tip of the needle to the hole in a bead and – it hopped right on! I stitched it to the quilt and continued unrolling and beading until I was done, or I had to stop.

If I stopped before I was finished beading that area, I simply rolled the tape back down against the quilt to capture the loose beads and went about my business until it was time to bead again.

Hint: If it’s going to be more than a couple of hours before you get back to the beading, I recommend rubbing the beads off the tape and into a container as they will get sticky if left on the tape too long (ask me how I know 😊).

After beading in this fashion for a while, a new idea hit! I could use the tape to keep the beads behaving and precisely where they’re needed by wrapping the tape around my finger:

1.  Wrap a piece of mailing tape, sticky side out, around the forefinger of your non-dominant hand (i.e. left, if you’re right handed).

2.  Pour the beads onto a flat surface and dip your taped finger into them.

3.  Knot your thread and bring it up through the quilt where the bead needs to go, touch the tip of the needle to the hole in a bead and it will hop onto the needle. Attach that bead to the quilt and repeat.

Voila! Beading can be done in the doctor’s office, at kid’s sporting events and even in a moving vehicle. One of the best advantages of this technique is that the beads are close to the work area and so, as the thread gets shorter, the beads are easy to reach.

I hope you’ll give it a try! Please send comments or photos if you do.

Thanks for the reminder Nancy!

Bending Threads II

August 2, 2020 4 Comments

I actually have two topics to share this week. So before I delve into a follow up post to the bobbin work from last week, I really need to tell you about the upcoming fundraiser auction for the Wisconsin Museum of Quilts and Fiber Arts. It takes place this week and begins tomorrow – Monday, August 3rd!!!

This image has an empty alt attribute; its file name is wmqfa-for-blog.png

I’m excited to be on the auction block – or at least for my work to be 😁. Here are the details of what I’m offering:

“You and three friends can participate in a 6-hour workshop provided by Chris Lynn Kirsch and held at the Wisconsin Museum of Quilts & Fiber Arts.  Enjoy the day learning a new technique, improving a skill, or having a fun and creative experience with friends, led by an award-winning quilter and teacher.  Select from Chris’s workshop offerings, found on her website: https://www.chrisquilts.net/classes/.”

I know there will be many other great items up for auction – and all the proceeds benefit our museum. So please join in on the fun! I apologize that the link in the image above doesn not work. Here’s the actual link to the site: https://www.wiquiltmuseum.com/calendar-of-events

Bending Threads and Bobbin Work

In response to last week’s post, my dear friend Evelyn sent me some wonderful photos and information about her experiences with bobbin work – and you’re gonna love it!

Evelyn has been featured in quite a few of my posts. She has been a blessing to me in so many ways. She was the friend who taught me how to make my Japanese jacket, inspired my “A View From My Window” challenge, she acted as my agent to get me teaching opportunities in Alaska and Arizona, she has used my “Crossing” technique in a variety of fascinating quilts, and is infamous for her part in our Quilt Sissie kidnapping adventure. If you have a little spare time, you may want to read some of those previous posts. Simply click on the subject of each one above to be linked to them.

This was her response to last week’s Bending Threads post:

Hi Chris, I’m sending photos of some of my bobbin embroidery quilts to use on your blog if you want to.  I’ve taken a close-up and a full quilt picture of each one.  I still have about 30 bobbins with the “thread” on them.


“I’ve tried lots of different threads.  It’s the only way to use decorative threads that won’t go through a machine needle.  The easiest to use is perle cotton, size 8, but I’ve also used sizes 5 and 3.  It’s great for metallics, too, or even multi-strand floss.  In most cases, I do the embroidery through a single layer before sandwiching, but it can be done as part of the quilting. 
I wanted the basket in this wallhanging to show up better, so I outlined the basket on the right side, then turned it over and stitched the lines to make it look woven.
“

“One of the first pieces I used the bobbin embroidery on was this multi-technique vest.  I used size 3 perle cotton to make the spider webs. You can’t get much thread that size on a bobbin and you have to loosen the bobbin tension more than with most threads.”

“This cotton and metallic thread made a nice filler in the open spaces of this wall hanging.  I traced the design on paper, then pinned it to the back and sewed through the paper.”

“I made this quilt in a workshop on ways to make and use circles.  I used metallic cord to highlight parts of the circles, and a satin cord in the border as part of the quilting.”

“I used a top thread in the color of the background to make this one look more like hand sashako.”

“Bobbin embroidery can be used on bed quilts, too.  My quilter echoed the same motif in the border.”

Almost a week after Evelyn sent me these wonderful photos, I received this message:

“This quilt is hanging in my large living/sewing room staring at me and I forgot it.  It’s called “Cycles to Fit the Stages of Life.” Cycles, Fits and Stages was the name of the challenge for a show and I took it literally.   The spokes are bobbin embroidered.”

Delightful! All of these quilts make me want to go do more bobbin work. I hope they’ve inspired you too. Thanks Evelyn!!!

**********************

And remember to go to the museum auction site: https://www.wiquiltmuseum.com/calendar-of-events, and support our wonderful fiber art museum!

A Great Binding Tip!

January 22, 2017 8 Comments

A number of years ago my friend Jean  showed our Open Lab class a clever way to control binding while attaching it to a quilt (to read a previous post about some lovely placemats Jean made, click here!). I thought I had posted about it, but can’t seem to find that post (after 6 years of blogging I’ve covered a lot of topics!)

The concept is quite simple and it requires 2 easily obtained supplies: an empty toilet paper roll and a piece of ribbon. After making enough binding to go around her quilt, Jean rolls it onto the toilet paper roll, threads the roll onto a length of ribbon, ties the ribbon around her neck, and stitches the binding to her quilt. The binding feeds evenly off the roll in an extremely organized fashion. Brilliant!

Fast forward to this past Christmas. Connie, another Open Lab friend, was making tree skirts (I posted about them in December – click here for that post). She chose to couch silver cording onto one of the tree skirts (for couching instructions click here). Jean just happened to have one of her special rolls with her and it made the couching oh so much easier:

Connie added the cording with Jean’s binding roller.

couching roll

Here’s a close up of the couching. It really added some extra zip to the tree skirt!

Thanks Jean, and Connie 🙂 !

I don’t know why I haven’t tried this yet, but I know what I’ll be doing with my next empty toilet paper roll.

Let me know if you try this. A picture of your project would be fun too!

Silly Goose

January 8, 2017 17 Comments

So here’s a fun way to begin the new year – sharing pictures of my latest quilt! A few weeks ago I mentioned that my most recent contest quilt had been accepted into the New Quilts From an Old Favorite contest at the National Quilt Museum in Paducah, KY. The judging is completed and I’m now free to share my quilt with you. The traditional block the museum chose this year was Flying Geese. While at the AQS show in Paducah this past Spring I got my idea. It’s called Silly Goose, and the label reads: “There’s one in every crowd. She just can’t follow the leader or the rules. What a silly goose!”

flying geese variation

It was great fun creating the crazy, silly-ness in the solo silly goose.

I used stretchy metallic fabric once again. You may remember my first experience with that in “40 Wonderful Years” (click here for that post). It was a challenge to sew on, but the stretchiness gave the trapunto a shine I loved. The only color I couldn’t find in a Spandex™ type fabric was orange, so I tried polar fleece. Another non-traditional quilting fabric. It is a little fuzzy, but I was pleased with the results.

Next, came the quilting. That was even more fun! I chose to free motion embroider designs on the background fabric in neon thread, before I layered and trapunto’d the top. This allowed the embroidery to lay on top of the poofy areas.

machine embroidered trapunto

The effect was just what I was looking for.

Once begun, the quilting took on a life of it’s own, and it was a joy.

This was followed by fused crystals in the small amount of space that wasn’t yet stitched.

WooHoo! I hope you can see the joy I have in playing with fabric, color and design. The Flying Goose exhibit will be hanging in the National Quilt Museum during Quilt Week this Spring. Then it will travel for two years to many shows across the country. All the quilts will also be featured in a book, published by the museum. It’s always fun to have a quilt travel and visit places I have yet to see.

I praise God for the opportunities and joy He’s given me through quilting!


  • Page 1
  • Page 2
  • Go to Next Page »

Primary Sidebar

Archives

Recent Posts

  • London ~ and More
  • Designed For a Purpose
  • Squirrel Quilts and More
  • Vintage Appliquéd Arrows and More
  • Fascinating Tidbits

Recent Comments

  • Karen Ann Moore on London ~ and More
  • Cheryl McLean on London ~ and More
  • Sue Halpern on London ~ and More
  • judy raddatz on London ~ and More
  • Joanne Corrigan on London ~ and More

Categories

Footer

My Guide

Whatever you do, do your work heartily, as for the Lord rather than for men.

—  Colossians 3:23

Contact Chris!

  • Home
  • About
  • Gallery
  • Classes
  • Trips
  • Books
  • Blog
  • Contact
  • Sign Up For My Blog

Copyright © 2026 · Chris Quilts · Website by Adunate · Privacy Policy